Sunday, August 30, 2009

In Search of Winogrand's 'New Mexico, 1957'

winogrand_new_mexico

There’s a photograph that has intrigued me since I first saw it. The image is black and white, portraying a late-1950’s tract home, desert scrub and mountains in the distance, with an upturned kid’s tricycle in the driveway, and a young toddler standing near the shade of the carport, sporting a quizzical look. Stormy thunderclouds can be seen looming over the distant mountain peak, at the base of which the letter “U” can be seen inscribed on the side of a foothill. On one column of the carport can be seen the house numbers “208.”

The image is titled “New Mexico, 1957” – the year of my birth – and was made by the famed documentary photographer Garry Winogrand. Seeing this photograph for the first time, years ago, brought an immediate sense of recognition; I knew those mountains, that letter “U” at it’s base, those scrub-infested desert foothills; even the style of architecture of the house was familiar. It is what was the eastern edge of the city of Albuquerque, New Mexico, the place of my birth and present domicile.

The year 1957 was not only the year of my birth, but was also at the height of the cold war tensions between the world’s two super-powers. Gigantic H-bombs were being brought into the US stockpile for the first time, many of them stored in underground bunkers carved into the hard granite of another mountain just a few miles south of – to the right of – the little kid, in diapers, standing in the barren, sloping driveway. My Dad worked at that secret base when Winogrand captured this photo with his Leica.

The city of Albuquerque was undergoing explosive growth in the 1950s, and this now forgotten tract home, lost somewhere in the midst of a mature metropolis, was back then on the very edge of town, tentatively tethered to civilization by the tenuous threads of barely paved roads and utilities stretched thin.

Three years after this image was taken, my family moved up to the east edge of town, in another tract home planted in the dry desert, only a few miles north of where Winogrand made this photo – at least by my estimation – based on the size and position of certain features of the ridgeline of the Sandia Mountains, in relation to the house in the photo.


There’s a certain sense of fear and uncertainty in the child’s pose that seems to foretell future tragedy. Oddly, the child’s unkempt curly hair resembles that of my two brothers and me at a similar age; we, too, have old black and white photos where we look almost identical to this anonymous child.

The storm brewing over the mountain seems to forebode of future events: five years later would come the Cuban Missile Crisis; a year later – actually, only a few months later – our own Mother would die, leaving three young boys motherless. Does the face of the anonymous toddler in the driveway seem to foretell this, like a distant vision on the horizon? It’s ridiculous; mere speculation; artistic symbolism at best. Yet in my delusional speculation I cannot help but to notice that Winogrand’s photograph serves as a document of a unique time and place, when what would become the northeast heights of Albuquerque was being carved out of seemingly endless wastes of yucca and sage and thistle, formerly just rangeland for cattle, now the heart of a teeming metropolis.

Our house was on the very edge of town, about two miles from the foothills of the Sandias. After windstorms, tumbleweeds would be piled up along the east side of our house, all the way up to the roofline; Dad would drag them away from the house with a rake and burn them. We would play in the dirt backyard, and finding “horned toads” was a common occurrence. Did the little kid in our photo also play with horned toads? Did tumbleweeds inundate its house, too? We can only speculate.

In the lower right corner of Winogrand’s image is a little stub of landscaping, a mere shrub, planted as if a flag proclaiming the desert to now be conquered in the name of the city that would soon arrive. This knee-high shrub foretells the future, too; were one to attempt to relocate this house, that mere shrub would either be a mature tree, or perhaps long cut down.

This is what I set about to do on a sunny, quiet Sunday afternoon in the late summer of 2009: to relocate that long-lost setting in its present context. The only clues I had to go by were: 1) the position of the house relative to the Sandia Mountains, and 2) the street number of the house, visible in the photo.

The position of the house relative to the mountain is problematic; from street level one can rarely glimpse the Sandia’s ridgeline, due to the close proximity of neighboring houses and mature trees. But I do know that the house was located on the east side of a north-south street; the house number ending in an even number, a convention common in Albuquerque, reinforces this. Chronologically, the proximity of the house to the mountain determines when it was built; the newer neighborhoods were built closer to the mountain, as the city grew eastward. Yet, too old of a neighborhood would locate the house too far distant from the foothills of the mountain for them to be seen at the size evident in the photo.

The street number is interesting. It is hard to tell if there is a fourth digit in the shadow of the carport, making the “208” into a “1208”, or perhaps a “2208”; this is crucial to determining the north-south position of the house within the city, whose numbering convention starts to the south, on Central Avenue – the old Route 66 – and increases northward. The question is whether neighborhoods in the 200 block north of Central were close enough to the specific features evident in the Sandia Mountain’s ridgeline for them to be somewhat south of (to the right of, in the photo) the house.

Driving around on this Sunday, it appears that the house is most likely numbered “1208”, after having investigated the further possibilities of “2208”, which appear to be too far north for the dip in the ridgeline’s curve to be just to the south of the house’s location; and “208” appears to be too far south. This is reinforced by later study of the photographic image found online, where deep in the shadows of the carport the leading digit “1” can be seen above the “208.” It’s “1208" for certain.

There’s also the matter of the house’s architectural style. A slightly pitched roof, with an edging of wooden trim; a carport with a one-car garage that’s recessed back from the front of the house, on the house’s right (south) side; the front windows divided into three sections vertically; and the sloping driveway. Of course, the possibility is very likely that after fifty-two years, considerable remodeling could have taken place, enough to perhaps entirely obscure the house’s identity.

Still, I was able to locate a neighborhood in the correct part of town for the mountain’s distinctive features to be visible in the correct orientation and size, with a style of architecture very similar to that in the picture, of an age approximately accurate for the date of the photo. And I located four houses with a house number of “1208”, which have, or once had, carports on their south side, and which were located along the east side of a north-south residential street. Of these four, one in particular seems to be the most likely candidate, located at 1208 Muriel.


I don’t know if our house in question is one of these for certain. There is a bit of uncertainty here, because in the early 1960s the right-of-way of Interstate 40 was cut through parts of northeast Albuquerque nearby, and many houses were leveled to make room for the highway; our house in question could have been removed along with all the others.

So, the look of fear and uncertainty continues to follow that little child in the driveway. The mystery remains; which is only fitting for all true mysteries. Perhaps I’ll never know the exact location of Winogrand’s photograph that continues to symbolize, as least for me, early childhood years in the growing American southwest.

Postscript:

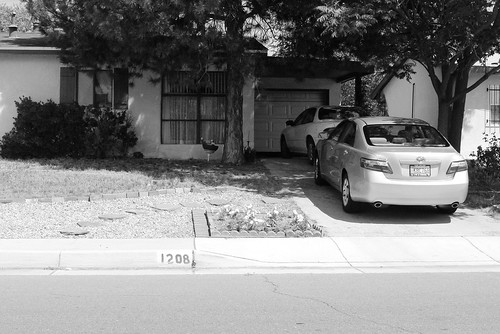
Since I’ve located the house made famous in Garry Winogrand’s “New Mexico, 1957,” I took the opportunity to make a closer photographic study of the structure, and to inquire of its present inhabitants as to any further back-story that they may possess.

Monday morning, a cool, late summer’s day, not yet 9am. I slung my camera across my neck and bicycled down Morris, a 30mph neighborhood feeder street, south toward the Bellamah subdivision, where the Winogrand house was located. Whereas yesterday there were two cars in the driveway, this morning there was only one. The sun was just peering through the branches of the large trees on the lot, planted much later than the photograph’s date of 1957, so I knew the lighting would be much different than that in the famous image.

I snapped a few images with my Lumix G1, thinking consciously of how Winogrand would have worked, and which lens he would have had on his Leica. Knowing that he used various lenses, including 28, 35 and 50mm, I set the focal length on the Lumix 14-45mm kit lens to the equivalent of all three of these settings, (since the G1 is a micro-4/3rd’s camera, whose angle of view is equivalent to ½ that of a full-frame 35mm camera at the same focal length), and with a reference print in hand adjusted my standing position at the base of the driveway while making various exposures at each equivalent focal length. Of the images I made, the one that comes closest to resembling the image created by Winogrand appears to have been made with a 35mm lens on the Leica; although I’m not entirely certain, because in the Winogrand image the lower half of the driveway appears to protrude further down in the picture than it does in my image; perhaps he used a 50mm lens and stood further away from the house, serving to collapse the perspective flatter. I probably failed to stand back far enough when shooting at the G1 lenses’ 50mm equivalent angle of view (that would be 25mm on the Lumix lens), a reminder that I must go back and retry capturing this image. He may have also crouched down, further heightening the sloping effect of the driveway.


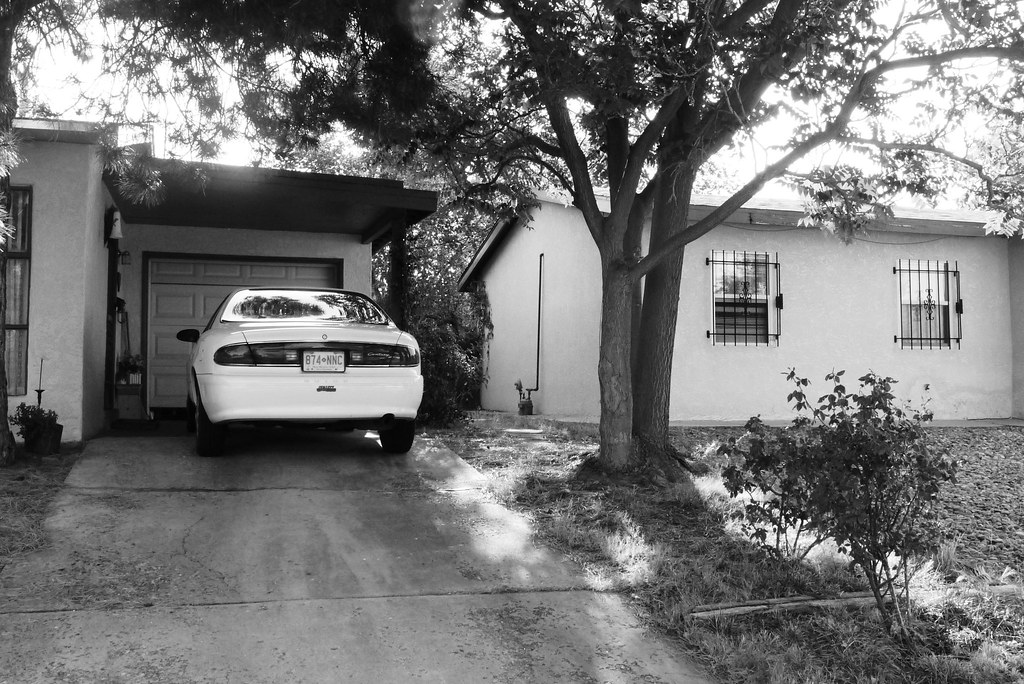
I tentatively approached the front door, which cannot be seen in Winogrand’s image, but is under the carport to the left, on the south side of the house, essentially directly behind, and to the left of, the diaper-clad toddler. I immediately noticed that the support column for the carport lacks the metal house numbers so easily visible in the image. I rang the doorbell and waited; through the storm door I could see a neat, orderly and homely domain, obviously attended to with much care. The TV was on, some morning news program; the Albuquerque Isotopes had clinched their division’s season championship.

She came to the door, wearing a colorful housecoat. An older, friendly lady, we stood at the door and chatted a while, had a most pleasant conversation. Her and her husband had moved into the house a bit over five years ago, having moved from California, but they had lived in Albuquerque years ago. The real estate company had mentioned that the house was made famous on someone’s photograph, but the lady had not heard of Garry Winogrand until this morning. I had to repeatedly spell it for her; she seemed intent on remembering the name, as her son, who lives in Colorado, was an aspiring landscape photographer.

She indicated that the house was pretty much unchanged, just a bit of remodeling. When they first moved in, the little shrub, seen in the lower right corner of Winogrand’s image, was a huge bush, obscuring parts of the driveway and sidewalk, and had to be removed. The three-tier brick coping, seen along the bottom edge of the house on the left, has been removed, and the house undoubtedly has been restuccoed several times, having served for years as a rental property; the garage door has also recently been replaced. The house-numbers so visible in the photograph have long since been removed, but visible through the layers of paint on the column are still the mounting holes for the metal numbers, like scars from an accident long ago.


We talked about photography and neighborhoods and how areas grow and change over the years, like people; some maturing with grace, others obviously having lived a harder life. The neighborhood where the house sits is aging gracefully, the house having been one of the first to be built in the neighborhood, in the late 1950s.

About five years ago, a man came to her door. He said he was the little toddler in the picture, and that he was famous. She thought him a bit full of himself, but neither did she know the name or reputation of Garry Winogrand.

Just behind her house, one block away, is the busy street of Juan Tabo; there’s a large retail building obscuring the view of the foothills that are so visible in Winogrand’s image from long ago, and the once-empty lot next door, just like the entire neighborhood, now sports other near-identical houses, with mature landscaping. It would never be possible now to recreate with exact precision the moment captured in time on Winogrand’s Leica; but that is okay, for photographs serve as totems within which we impart the power of memory with that of the image made visible.

As we end our conversation, she departs into the recesses of the house, and I finish snapping a few more pictures. I notice, holding the handgrip of the G1 in my right hand, a scar on my thumb, from long ago, seventh grade, when in art class I sliced my thumb open with a razor knife while attempting linoleum block printing. The scar is still visible all these years later, although my body has changed considerably. It’s like a remnant of an earlier age, a reminder, etched in flesh, of a time long ago. That is what I think when I stand in front of 1208 Muriel with a printout of Winogrand’s image in hand. It has been a good morning.

Sunday, August 23, 2009

Managing the Paraphernalia


This blog posting by Little Flower Petals has me interested in discussing the mundane ways in which we manage our writing process. Specifically, how do we hold our pens?

I used to place my favorite pens in a special pen cup on my office desk, but this didn't answer the question of how best to manage writing implements when on the go. I do have a favorite travel bag with which to carry my writing paraphernalia, a PacSafe MetroSafe 200, but merely throwing an assortment of writing instruments in a pouch seems, well, disrespectful.

So one day I began thinking about this pen problem, and started remembering elegant eyeglass cases that women used to carry. I figured that I could find such an accessory at one of several antique and thrift shops in town, so off I went, in search of the ideal pen case.

I ended up with this case, a Lanvin Studio aluminum eyeglass case, at a thrift shop. I think I paid around $8. Now, this case isn't the largest object for containing pens, so I have to decide on just the essentials of what I want to carry.


Here's the contents, from left to right:

A refill cartridge of 0.7mm Pentel leads, for my mechanical pencil.
A red Pilot felt-tip marker, for redline editing my writings. I tried using a red ballpoint pen for this purpose, but the pen ended up leaking ink in warm weather.
A 0.7mm Pentel mechanical pencil. The writing on the barrel of the pen is obscured, due to use, so I don't know the exact model number. I find the 0.7mm size leads the ideal compromise between fineness of point and durability from breakage.
A Parker ballpoint pen, my favorite type of ballpoint. I don't often write with ballpoint (I mean writing write, not just write write -- know what I mean?) but when I need one, it's there.
A blue Pelikan M100 fountain pen, medium nib.
A marbled green Pelikan M100 fountain pen, medium nib. I really don't need a second fountain pen, since I also carry a bottle of refill ink in my bag, but you never can have enough fountain pens!
A refill pack of Pentel mechanical pencil erasers.

I should also mention that, inside my MetroSafe 200 I have a bottle of Parker Quink blue/black fountain pen ink, wrapped inside a ziplock baggie (but I've never had issues with leaks).

My writing process seems to work best when I'm writing with fountain pen, in some place where I'm not distracted by conversation (coffee shops work best it seems, despite the background noise, which works for me like white noise). Then I redline edit the writings, sometimes as I'm still composing. Then, when the handwritten draft finally gets typed into the computer (or onto a manual typewriter) I'll sometimes do minor revisions along the way.

I also get ideas that are worthy of sketching, which I lay down in a journal using mechanical pencil. I've been doing this since the early 1990s, and I've filled several notebooks full of what I call camera sketches, ideas for box cameras and other homemade photographic projects. This is how my falling plate camera ideas came to fruition.

How about you? How do you manage your writing paraphernalia?

Darkroom Tip-O-The-Day, Part 2


In a previous entry I had mentioned falling plate cameras, a way of overcoming the one-shot limitation to pinhole box cameras. I reinvented this idea, originally conceived in the formative years of photography in the 19th century (as King Solomon lamented, there is nothing new under the sun).

The problem with the box camera is that, although it represents a simple way of exposing large format sheet film or paper, minus the cost of a multitude of sheet film holders, it's limitation to one shot at a time renders it impractical for extended photo-safaris into scenic areas that would benefit from the acreage of large format sheet film. In an attempt to overcome this limitation, I conceived of a stack of film holders - mere matte boards, cut to size, stacked horizontally in the rear of a camera, to the front sides of each were affixed a sheet of film or paper, and a mechanism incorporated into the box permitting the front-most holder to be dropped, face down, into the bottom of the box after its exposure.

8"x8" FORMAT
The first camera I built that utilized this principle was a box constructed from 1/4" oak plywood, using a film format of 8"x8", and holding 8 matte board film holders. The front view of this camera can be seen in the title photo of this entry. The shutter, a guillotine-type of sliding shutter, can be seen in the open position.


This next image shows the rear of the camera, with the lid removed, and the stack of matte board film holders visible. There are two sets of notches cut into the matte boards, on each side. In front of the stack of holders are two sets of sliding brass pins, operated by sliding knobs on the outside of the camera, which cause the pins to slide up and down. The notches in the matte boards are cut off-center, and alternate between each board up and down.


This image shows the rear of the camera, minus the film holders, where the pins can be clearly seen.


Here are the stack of film holders arrayed out for display. There are two strips of black paper, top and bottom, behind which the 8"x10" paper is retained, providing an 8"x8" square format image area. Again, the notches in the sides of the boards alternate off-center up and down; the operation knobs are alternatively slid up and down to drop each film holder, after exposure, into the bottom of the box.


Here are the details of the rear operation knobs, the cylindrical dowel, which move up and down, operating an internal plate that moves up and down in a light trap, to which are connected the two metal pins. Also seen is the machine screw used to secure the rear lid in place. The lid has a 1/4" ridge as a light trap that mates to a 1/4" slot in the rear of the camera. There are also several springs glued to the inside of the lid which help keep the stack of matte boards pushed forward against the retaining pins. On the bottom of the camera the matte boards sit on an elevated platform, raised in height above the bottom floor of the camera enough to permit the whole stack to fall properly.


This image was taken using this camera at Casa Rinconada in the Chaco Canyon National Monument in northwestern New Mexico, using a paper negative.

4"X4" FORMAT
The next box camera I built on the falling plate principle was smaller in size, again square format, but using 4"x4" negatives. These were cut from 8"x10" sheets of paper in the darkroom.


This first image shows the front view, with the shutter open. The frame of the camera is soldered together from sheets of galvanized steel, and covered in beige craft foam. It also uses a guillotine shutter with a brass operating tube. Sighting dots can be seen on the top and sides.


This next view shows the rear of the camera, lid removed, without film holders. The main features are the double-wall light trap, made of galvanized sheet steel, and the square brass tube mechanism on top with the protruding pin. This brass tube is actually a nest of three different sizes of square cross-section brass tubing. The outer tube is in the middle, to which is soldered the protruding square brass pin; the middle tube extends across the width of the camera's interior and is soldered to both left and right side walls; the inner tube is removable, connected to the brass knurled knob protruding from the left side. This knob and tube are used to alternatively move the protruding brass pin back and forth, left and right. The series of nested tubes acts as a light trap. On the bottom of the camera's interior is the raise shelf upon which the film holders rest, with a raised lip (about 1/4" tall) preventing the bottoms of the holders from falling off the shelf due to movement.


This next view shows the rear of the camera with the film holders in place. The brass retaining pin is currently keeping the front-most plate from falling. This camera can hold eight film holders. The paper negatives are merely taped to the front of each holder using a loop of painter's masking tape. The exact distance from pinhole to film plate is not critical, due to pinhole's almost infinite depth of focus. Were this camera to use a glass lens, the exact positions of the film plates and negatives would be much more critical.


This next image shows the inner brass tube/knurled knob has been removed from the left side and inserted into the right side, which slides the brass pin to the left. You can now see the brass pin aligns with the notch in the top of the front-most film holder, permitting it to fall face down into the bottom of the camera. The camera has to be gently tilted forward for this to happen; I also try to listen carefully for the subtle sound of the plate falling.


Here is an abstract composition captured using this camera onto Freestyle's APHS litho film.


5"x8" FORMAT


Pleased with the smaller 4"X4" format's portability, I wanted an intermediate sized camera. I chose the 5"x8" format, although this camera can also do 5"x7" and also 6"x9.5". This camera was actually originally conceived to use sheets cut from a roll of aerographic surveillance film, 9.5" wide, but the thin-based film proved to be too curled for this type of film holder to successfully manage. I can cut two 5"x8" sheets from a single 8"x10" sheet of paper, or a single 6"x9.5" sheet.

This front view shows the guillotine shutter in its open position. Viewing dots are on the top and sides to aid in composition. The large black knob on top rear is the film changing knob. The hinged plywood base was added after construction in order to add additional weight to the camera. Normally lack of weight is not a problem with large format box cameras, but in the case of this camera it was built very efficiently, from a space frame of 1/4" hardwood square dowels and covered in sheet aluminum flashing using JB Weld epoxy cement. The hinged base also permits use of my homemade large format wooden tripod, which lacks an articulating head.


This next image shows one of the film holders with a paper negative already mounted. I had forgotten about this negative being in the camera, and discovered it only when I setup the camera to be photographed for this article. It's now toast. The paper negative is secured to the holder by several loops of painter's masking tape. The holder itself is made from sheet aluminum flashing, spray painted first with metal primer, then flat black paint. The off-center notch is seen in the top of the holder.


Here we see the film holder mounted in the camera, with the retaining pin capturing the front-most holder from falling. The operating knob works a sliding wooden plate built into the 1/4" thickness of the camera's frame, whose threaded bolt protrudes out to act as the retaining pin.


This image shows the operating knob has been slid to the left, permitting the retaining pin to now align with the notch in the front-most film holder, permitting it to fall to the camera's bottom when tilted forward. This camera operates very smoothly and efficiently, but the film holders fall so silently I often wonder if they work properly when out in the field. Also, the camera's interior is covered in adhesive craft felt, a great light absorber.


Here is an image captured onto a paper negative using this camera, at the Sandstone Overlook in the El Malpais National Monument in western New Mexico.

Well, there you have it. Now you all can go out and make your very own falling plate box cameras. I will be expecting some reports soon. ;)

~Joe

Still Clicking After All These Years


It’s difficult to know whether it’s appropriate to write about this, as it comes precariously close to sounding like I’m tooting my own horn, seeking some sort of public approval; that’s not my intention in writing this; rather, to encourage others to pursue their dreams, even if they take years to fulfill.

I have twenty-two of these little devices constructed, neatly arrayed in a plastic container. These aren’t rockets, and I’m no rocket scientist. Neither am I a finely skilled craftsman, although that’s what it would take to do a nicer job on these than I did. No, I’m a mere hack; but a clever hack, and managed, with marginal skill and meager tools, to fashion these little wooden devices, intended for the edification of a classroom of kids in a nearby town.


Today there are families of craftspeople in Japan who, having carried forth the tradition of their elders, and their elder’s elders, continue to fashion finely crafted soroban, the Japanese bead-frame abacus, using the same materials and similar designs of those crafted hundreds of years ago. These can be seen being operated by merchants and noblemen in classic Japanese artwork of the period. They are still being constructed and used today, and their benefits in accelerating the mental capacity of children are being more widely recognized.

How I ended up constructing twenty-two soroban in my workshop, for a teacher’s class in a small town in central New Mexico, is an odd tale, one of those that only happen in real life. I’ve recounted some of this in a previous blog entry, but perhaps rehashing the highlights is appropriate.


I happened upon the abacus while in high school, by fortuitous accident, having found a Japanese import shop that sold them, and also a classic book on the subject, written by Kojima. My personality fit well with anything unusual, odd or different – anything that no one else was into – hence the soroban was a perfect interest to take up.

I’ve continued my abacus interest, and basic operational skill, throughout my adult life. Several years ago I discovered a Yahoo discussion group on the abacus and through that group came into contact with a teacher in Socorro, New Mexico, a Taiwanese native, who was conducting a series of seminars at her school intended to introduce elementary school teachers to the abacus as the focus of an instructional program to supplement the normal math curriculum. I was invited to attend several of these seminars, during which I brought along several examples of abacus that I had built. One of the teachers at the seminar saw my handiwork and contacted me, inquiring as to the possibility of constructing a set of abaci for her classroom.


Over the years I had become interested in pursuing the design of a nine-bead abacus, a sort of modernization of the ancient Russian ten-bead abacus, as an alternative to the soroban, and as a result I had begun collecting various shapes and sizes of craft beads for use with the crude frames I was constructing. The problem of finding just the right size and shape of bead continued to haunt me, however. It seems that there really is no adequate substitute for the finely made biconic wooden soroban beads manufactured in Japan. I therefore made contact last year with a manufacturer in Japan and managed to secure a shipment of one thousand beads, at a cost of ten cents per bead. These things weren’t going to be cheap, but then again anything worth doing is worth doing right.


I had intended on using this shipment of soroban beads for making a few nicely crafted abaci for myself, but ended up just storing the beads away unused, as other issues became more important. And then one day I get a phone call from the teacher in Socorro, and the abacus project was suddenly on the front burner, and wouldn’t you know that those one thousand beads were just sitting in their plastic bag waiting to be called into service for a greater cause. I suppose it was meant to be, looking back on it now. Sometimes you can’t see the path forward until after you’ve broken through, and turn around to look back at where you’ve come from.

So, there they sit, these neatly constructed wooden frames with their uniform rods of diamond-shaped beads. I still have a few finishing touches to make before I can call them done. And then off they’ll go, like a whole litter of kittens being let go all at once, and perhaps for a few days I’ll feel a bit forlorn, like some empty nest syndrome, all that work and care and attention. But I must remind myself of that classroom of bright, young faces and eager fingers, and the tactile pleasure I first felt as a child when my fingers first clicked those elegant beads. Forty years later, they’re still clicking.

(Photographic note: don't attempt to portray your beloved handiwork under the harsh light of your shop's fluorescent light fixture. Incandescent or daylight would've been better.)

Update:
More background on my abacus pastime is appropriate.

This first image is the first 9-bead abacus that I constructed, back in the 1980s, and actually used in a TV repair shop to calculate repair bills. The round, plastic faceted craft beads were all I could find at the time; the alternating colors are useful in visually comprehending the size of number groups. Odd numbered groups (like 5 or 7) are characterized by the end colors being equal, while even numbered groups (like 4 or 6) are characterized by opposite end colors. This helps to overcome the primary disadvantage of the nine-bead abacus as compared to the 1:4 soroban, which is that the bead grouping sizes for numbers larger than four are more difficult to immediately comprehend. The advantage of the nine-bead abacus over the soroban is the lack of five's, and nested five's/ten's, complements problems; thus the nine-bead abacus is a good "starter" abacus for people just learning the concepts.

An example of a "nested complements" problem on the 1:4 soroban is 6+7, which requires a five's complement step be performed in order to complete a ten's complement intermediate operation (minus three is broken down into plus five, minus two). The nine-bead abacus only requires the ten's complement intermediate step (minus three, add a ten bead).

Oh, and the twenty columns of beads are not indicative of the over-priced repair bills at the TV shop(!); rather, when calculating sales tax (5.8125% at the time) required the subtotal be entered on one side, the tax rate on the other, and the cross-multiplication made on the middle rods. Later I figured out a shortcut for 5.8125%, which is 93/16, performed by: 1)multiplying by 100 -- done mentally by moving the decimal point 2 places; 2)multiply by seven and subtract from the subtotal; 3)dividing by 4 twice. This is much faster than multiplying by a five digit number.

This second image is a variation of the nine-bead abacus, with a different color scheme. Again plastic craft beads were used, round faceted in design. It's getting harder and harder to find abacus-acceptable craft beads at the big-box craft stores; these are about the only ones left from which to choose from. I also experimented with a 3-3-3 scheme of white-black-white; in the end I decided the original alternating design was best. You may also note in this model the prototype design of the "rod & lintel" construction method, which promises easier construction and an elegant design. I didn't use this method for the batch of twenty-two abaci constructed for the class in Socorro, as I thought they wanted a more traditional design.

This third image is the new "rod & lintel" construction method applied to a 1:4 soroban arrangement, using Japanese biconic beads. You'll notice the rods are of brass, and the cross-bar, rather than being a thin strip of laminated wood, penetrated by holes for each rod, instead is a piece of solid brass rod; this produces an interesting and unintended musical tone when swiftly flicking the beads back and forth. Perhaps I'll need to tune these abaci to some musical note? Also worthy of note is that this prototype is absent the decimal-place dots visible in the previous model; I would continue to use brass brads for this purpose in actual salable models. The lintels are of Brazilian cherry, the rods of black walnut. Going forward, were I to begin making these soroban for sale, this is the design I would prefer.

(Additional photographic note:
My Flickr account is approaching the 200-image limit for free accounts; thus I am uploading images to my blog direct from my computer, which are limited in resolution by Blogger itself; thus the small size and poor quality.)

~Joe

Tuesday, August 18, 2009

Typecasting the Grid


Anyone interested in doing this (I'm not sure why you'd want to) can use Excel. First highlight a group of cells in a blank document of the required quantity of characters and lines, and format the cells' borders with solid lines such that they can be seen. Then highlight the group of cells, and format the column width to "0.83" and the row height to "13.5". Then under file/page setup, select the default print setup to a magnification of 91%. At least on my laser printer, this produced a grid that matches the type face and spacing of my old Underwood Universal, which types at 10 characters per inch (is that pica or elite; I can't recall?) The result: instant eye chart. Maybe I won't be doing this again, at least for a while. But it was fun. ;)

Monday, August 17, 2009

Darkroom Tip-o-the-Day, Part 1


Wednesday, August 12, 2009

Stamp Casting, Anyone?


It's not art. It's not poetry; or at least not good poetry. It's not neat, or clean, or even very crafty. It's not even typecasting. Stamp casting, anyone? Was this how it could have been done, before Gutenberg? This is what happens when you venture forth to Hobby Lobby, with your Grandson, intent on just "seeing what they have," without a clear gameplan of what specifically you came for. But at least now we are well stocked. And when all our intricate and fragile mechanical marvels called typewriters are rusted and broken, and no one remembers how to repair them, and no parts are available (or no ribbons can be had, kind of like we can keep our guns, we just can't find ammo), we at least have this to fall back on.

Actually, I think it would be cool to find a set of printer's dies, a complete set of the alphabet, including numbers and punctuation, and try to do this a little more organized, perhaps line them up on a makeshift wooden frame; not really like a true printing press, but just makeshift. Ink the die, pull a few sheets to get the ink set just right, then viola, DIY home printing press. Imagine the work required to typecast just one blog entry using this method. It had better be good; better than just droning on and on about one's writing and typecasting, which is what we (we meaning I) do when we've nothing important to say.

I suppose that is what blogs -- and journals, and diaries -- have always been about, voicing one's inner feelings in some form of concrete media, as if the laying of it down on ink and paper somehow makes the abstract tangible, a pronouncement that what was once just in one's imagination has now been born into the world, attained realism.

Rather than merely drone on and on about writing and art and media, perhaps one (one meaning I) should "free cast" some of my actual writings -- short stories, mainly -- into the outer realms of the interwebs; a setting free of that which has been held captive. In installments. I suppose you could call it self-publishing; or giving it away for free, which sounds a bit less, er, moral? Hmm, perhaps not.

~Joe

Sunday, August 02, 2009

The Closure of Photography


While musing several years ago on these issues of the mathematically finite precision of the digital image, I happened upon the idea of the Pixellator Camera, a simple box camera using a projection screen and pixellation grid immediately in front of the film, which transcribes the indeterminate complexity of an analog projected image into a grid of pixel squares of varying degrees of grayness. The lens for this camera is a large pinhole, approximate in size to the pitch of the pixel grid. Silver gelatin paper negatives were employed in the creation of the self-portrait accompanying this article.


Details of one pixel grid cell: