Monday, June 29, 2020

Visiting the Radio Nomad

James the Radio Nomad and his dog Ash
Visiting the Radio Nomad

With these uncertain times ahead of us, seeing how James is managing his business and personal interests, while not being tied down to some geographical locale, looks to me like a way of the future. High-tech nomadism is certainly not the first thing a baby boomer like myself would have thought of, but this new generation sees things differently, they don't have the emotional and cultural baggage of my generation. More power to them.

It also helps that James is young. As he said in our conversation, he'd rather be RVing while young and vibrant than when old and feeble. Plenty of time to get tied down with life's responsibilities later on, if that's in the cards.

The key to his Radio Nomad lifestyle is an Internet modem that's cell-network connected; and the Q Go Live software that enables live broadcast quality production anywhere there's a cell signal.

I think his retro NTSC monochrome video camera studio setup is just wonderful, on so many levels. It gives me ideas ... !

Labels: , , , , ,

Friday, June 19, 2020

Experimental Camera Sketching

60 Degree Pin Speck Camera Sketch
Camera Sketching

In the top right hand portion of my sketch journal, the light path is defined by the dashed ink lines, which enter the camera on its left, into the mirror box area, then down onto the film. The various pencil lines define primary and secondary sources of potential light fogging, which I've attempted to minimize using various baffles and other means.

Here's a crop of a sketch of a simpler design that uses an angle of view just under 45 degrees, without all the complicated baffles:

45 Degree Pin Speck Camera Sketch

The tiny mirror is in the upper right corner of the box. The light enters the box from the left, reflects off the tiny mirror to form a coherent, pinhole-like image, and onto the film at the bottom. The diagonal wall protects the interior from stray light. Any stray light that glances off the upper wall, past the mirror, will hopefully be absorbed by the flocked interior walls before fogging the film. These narrower angles of view are relatively easy to achieve. Still, an earlier test camera, from circa 2013, only showed marginal success:

Pin Speck Test Image

As you can see, the image above was partially obstructed by the black felt covering the surfaces near the mirror box. The more felt used to cover the interior surfaces, especially near the mirror itself, the more obstruction results; less felt gives a wider angle of view but doesn't absorb stray light as well.

My newer design idea (at the top right sketch journal photo) is for a camera with a 60 degree angle of view, much more challenging than the 45 degree version. As I alluded to in the typed piece, even black felt can reflect light, if it's off the surface at a slight glancing angle, so-call "forward scattering". This new idea permits the film to "see" a black chamber behind the mirror, a space mostly devoid of stray light.

The primary fogging light comes from the left, through the gap between the open edge of the diagonal dividing wall and the mirror, then on to the right side of the camera. Here I've made a "photon dungeon", a space with non-parallel walls covered in black felt that will (hopefully) absorb the stray light, using a baffle wall that keeps this light from fogging the film. There's a secondary potential source of fogging, a view from the film to just left of the edge of this baffle wall, then into the upper right corner of the box behind the mirror. This corner space could be fogged by stray light from the primary fogging source, so I've included another wall dividing the two. So the film should "see" a mostly black space just to the right of the mirror.

Another decision is the lower wall of the inlet pyramid, on the left side of the camera. I could flock it with felt and make it follow just outside of the light path, but this would risk forward-scattering of light into and around the mirror box. Instead, I've chosen to make this side of the camera be the outer side of the diagonal dividing wall itself, with the light inlet mask at the left opening providing a shadow for this surface. Yes, light will reflect off this wall, but not at such a severe glancing angle.

There are further light baffles, providing photon dungeons, in the upper left corner of the drawing.

Another insight I had was the volume and size of the camera has a direct effect on the efficiency of the light-absorbing properties of the photon dungeons. Even though the film format may be, say, 4"x5", if the camera is made much larger, say at least 10" wide, those darkened interior spaces opposite the film, being much larger, will do a better job of absorbing light, due to the inverse square law causing more light intensity fall-off of stray light.

The thickness of the main diagonal dividing wall has a direct effect on the size of the gap between the open edge of the wall and the mirror. A thicker wall, flocked much heavier, will need a larger gap, in order not to obstruct the 60 degree angle of view; which in turn will cause more stray light to enter the camera. A thinner wall means its open edge can be closer to the mirror, providing a smaller gap for stray light to enter; but can a thinner wall still have low reflective (and forward scattering) properties? Maybe I need some of that new "vantablack" material, made from carbon nanotubes, that has less than 1% reflectivity.

Stepping back from the technical minutia of this project, there is no practical reason to build such a camera, except to be able to say that I built it. Conventional pinhole cameras do just fine. As do modern digital cameras and smart phones, for capturing photographic images. So what's the point? I think for me it's somehow tied into my long history of camera-making, especially oddball cameras employing strange or novel ideas. It's doing it for the sake of doing it.

Labels: , ,

Thursday, June 18, 2020

Reactivating the Activator

Brother Activator 850TR
Reactivating the Activator

If this wasn't intended as a gift (and if my wife didn't object) I might keep it. No, they're not fancy or elegant, nor do they exude solidity, but they simply work well. Exemplars of practicality. I hope its recipient enjoys it.

Labels: , ,

Tuesday, June 16, 2020

The Numbers Game

Burroughs Key-Operated Comptometer
The Numbers Game

When I first acquired this comptometer from a local thrift store several years ago, I'd noticed the worn keycaps, indicating years of long fingernails on keys (there's even a hint of red fingernail polish on some), but didn't understand at the time why only the 1 through 5 keys showed this wear, nor why the 3 keys seemed especially worn. Now I understand.

Burroughs Comptometer keyboard

Then I located this archived scan of the book How to Use the Calculator and Comptometer, Third Edition, by James R. Meehan, distributed by Gregg Publishing, and finally sat down today to read up on the formal method of comptometer use.

As it turns out, the book teaches a "touch method" whereby the first and second fingers of the right hand are located on the 3 row - the home row - and the fingers are permitted to reach from the 1 to the 5 keys. For addition and subtraction, numbers larger than 5 are entered in a two-step process; for example, 7 is entered by pressing 4, then 3, in rapid succession. It may seem slower than directly entering the 7, but this method enables the user to enter these numbers by feel, keeping one's eyes on the work at hand, and thus ends up being faster in practical use.

This explains the wear on only the 1-5 keys, and the excessive wear on the 3 row. The user(s) of this machine (my sample dates back to ~1915) obviously were schooled in use by the Gregg method, which I find very interesting.

I should also mention that the odd-numbered key caps are dished in, while the even key caps are flat, making it easy to navigate the keyboard by feel.

Okay, but is using this machine any faster than a crank-operated adding machine of its day, or a modern electronic calculator (or computer keyboard) of today? I can say without a doubt yes! The Gregg method requires the use of the first and second fingers of either or both hands, and the entire number is entered in at once, parallel fashion. Emphasis is made on using the correct fingering technique for efficient number entry; the fingers hover over a group of keys to form the number being entered, and they are all pressed down at once. Being a "key operated" adding machine means as soon as the keys are pressed the calculation is performed and the digits in the register dials immediately indicate the result, real-time, as the calculation progresses, by means of the machine's internal planetary gear mechanism. This is the difference between a comptometer and a lever-operated adding machine.

By the way, the lever on the right side of the Burroughs machine is for clearing the machine, not for number entry.

For example, to add three 3-digit numbers, the right hand forms each number in turn and makes three rapid presses of the keys, which takes less than two seconds. I can't do this same sequence of operations (adding three 3-digit numbers), using a conventional electronic calculator or keyboard, nearly as fast. The difference in speed is amazing.

Subtraction uses the smaller sets of numbers on each key, which are the 9-complements of the main numbers, and the technique is to enter the complement number that's 1 less than the actual number being subtracted. For example, to subtract 18, the user simultaneously presses the 8 and 2 keys on the tens and units columns, which corresponds to the 1 and 7 complement numbers (i.e. 1 less than 18). In practice this is entirely intuitive and easy.

I'd already grasped addition and subtraction before I found this manual online, so what I was interested in was discovering how multiplication and division worked. Would they be difficult and time-consuming to learn? Surprisingly, no. Multiplication and division use the entire keyboard; numbers larger than five are entered directly, rather than broken up into smaller numbers like with addition and subtraction. In multiplication the user enters the larger of the two numbers being multiplied (the multiplicand) and, starting at the units column (it can be done in either order) presses the number into the keyboard that number of times corresponding to the units number of the multiplier. Then the user shifts the fingers so the same multiplicand number starts at the tens column and presses it in that number of times corresponding to the tens digit of the multiplier, etc.

For example, in the problem of 357 times 24, the 357 is held over the keyboard starting at the ones column and pressed in 4 times; then the fingers are shifted one column to the left and that same number is pressed in 2 times, for an answer of 8568. In practical use a three digit number times a two digit number can be done in about 3 seconds. I can't do it that fast on a modern calculator, no way.

I won't attempt to describe in words how division works, but suffice it to say that it's quick and easy. I plan on making a video about this soon, if you're interested; but in the meanwhile check the link above to the instruction manual for details.

I will say this: I've kept my Burroughs comptometer stored away to protect it from dust and because of its size, as it takes up a sizable footprint on my desk. But also, up till now I'd only known how to add and subtract, whereas I frequently have need for multiplication. Now I can see the possibility of using it for more practical purposes in my daily life, and that's exciting.

How to Entertain With Your Pocket Calculator

I've just received this book today and haven't yet delved into it, but there are lots of fun party tricks a person can do with the humble pocket calculator. I was inspired to get this book by a fond memory, from back in the 1970s, of a book called Games Calculators Play; back when these were new gadgets and I'd begun to amass a small calculator collection.

Voss Modell 50

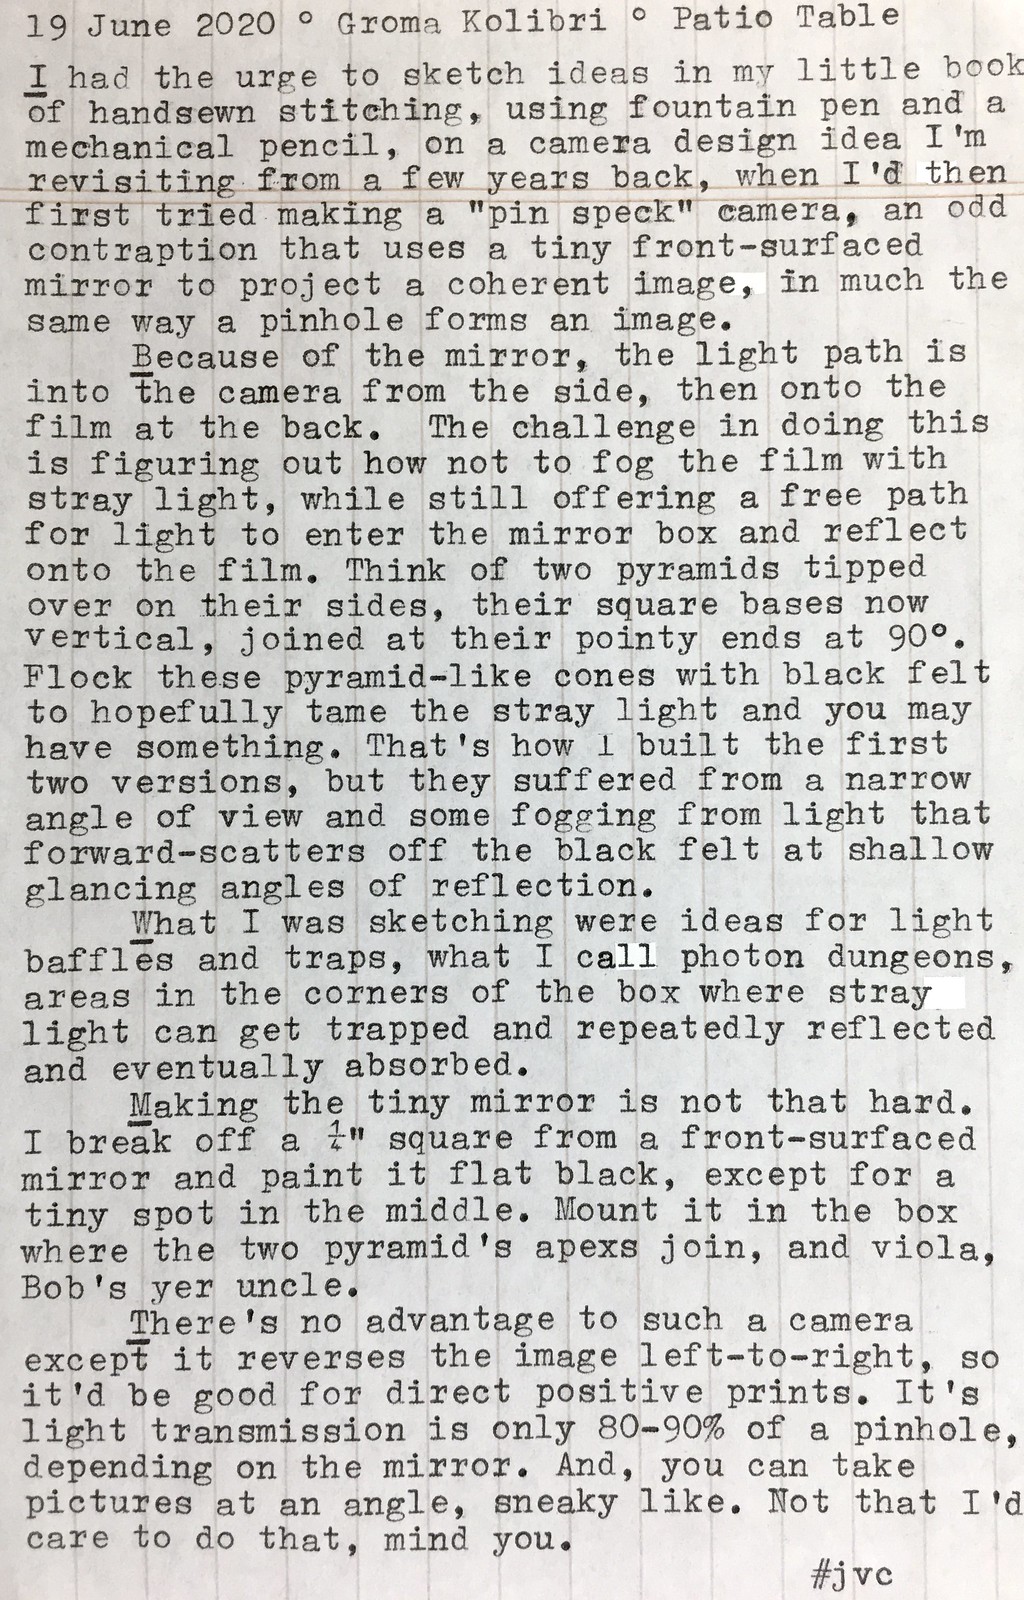
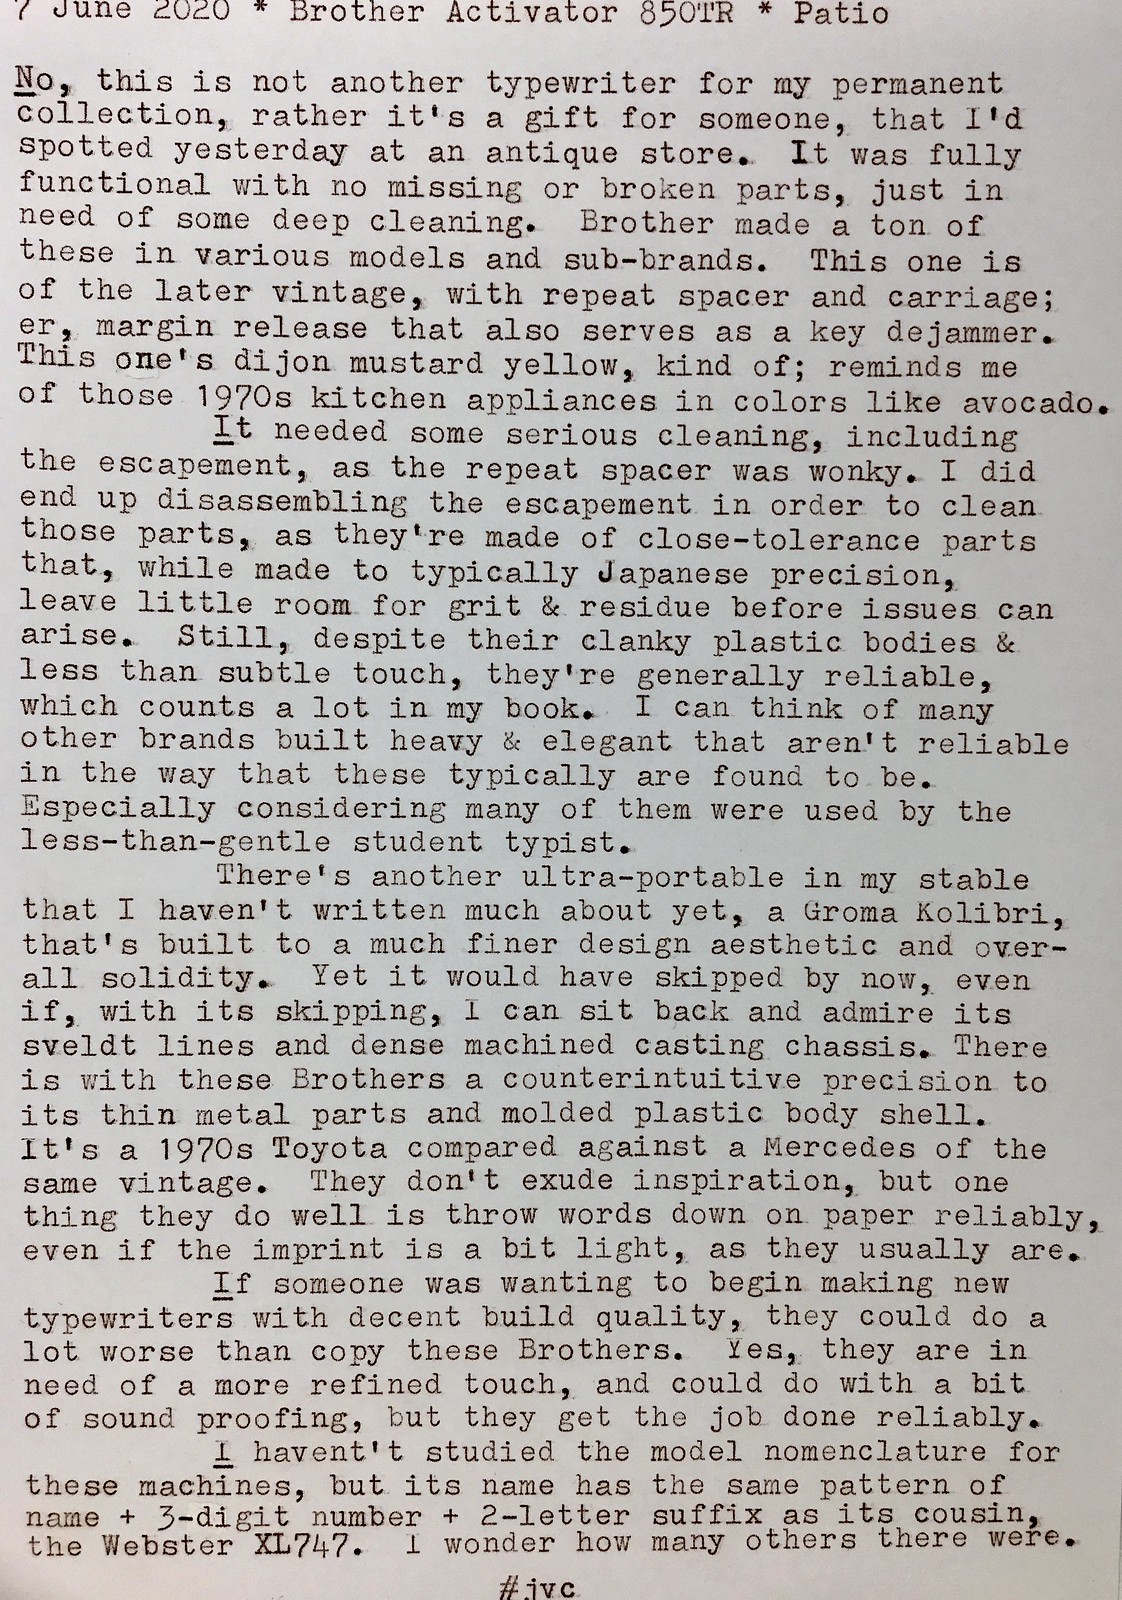
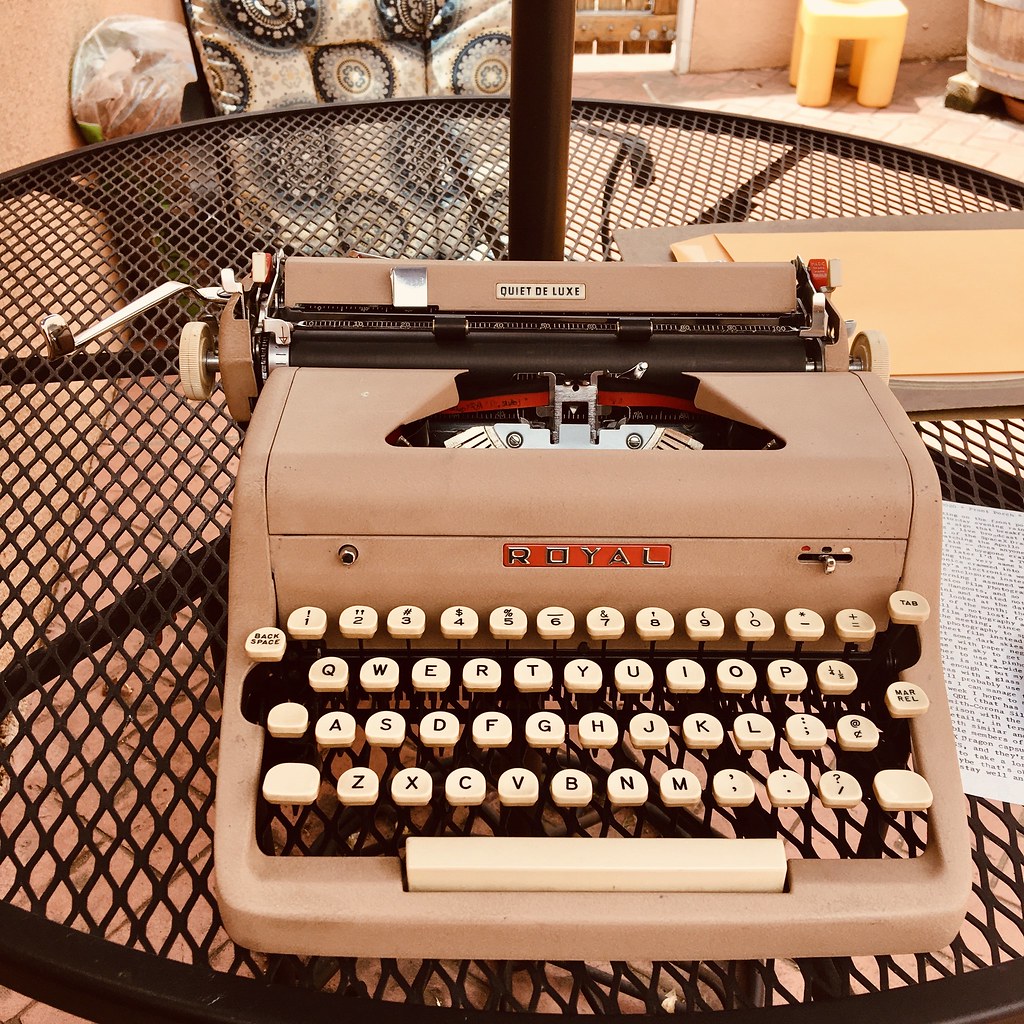
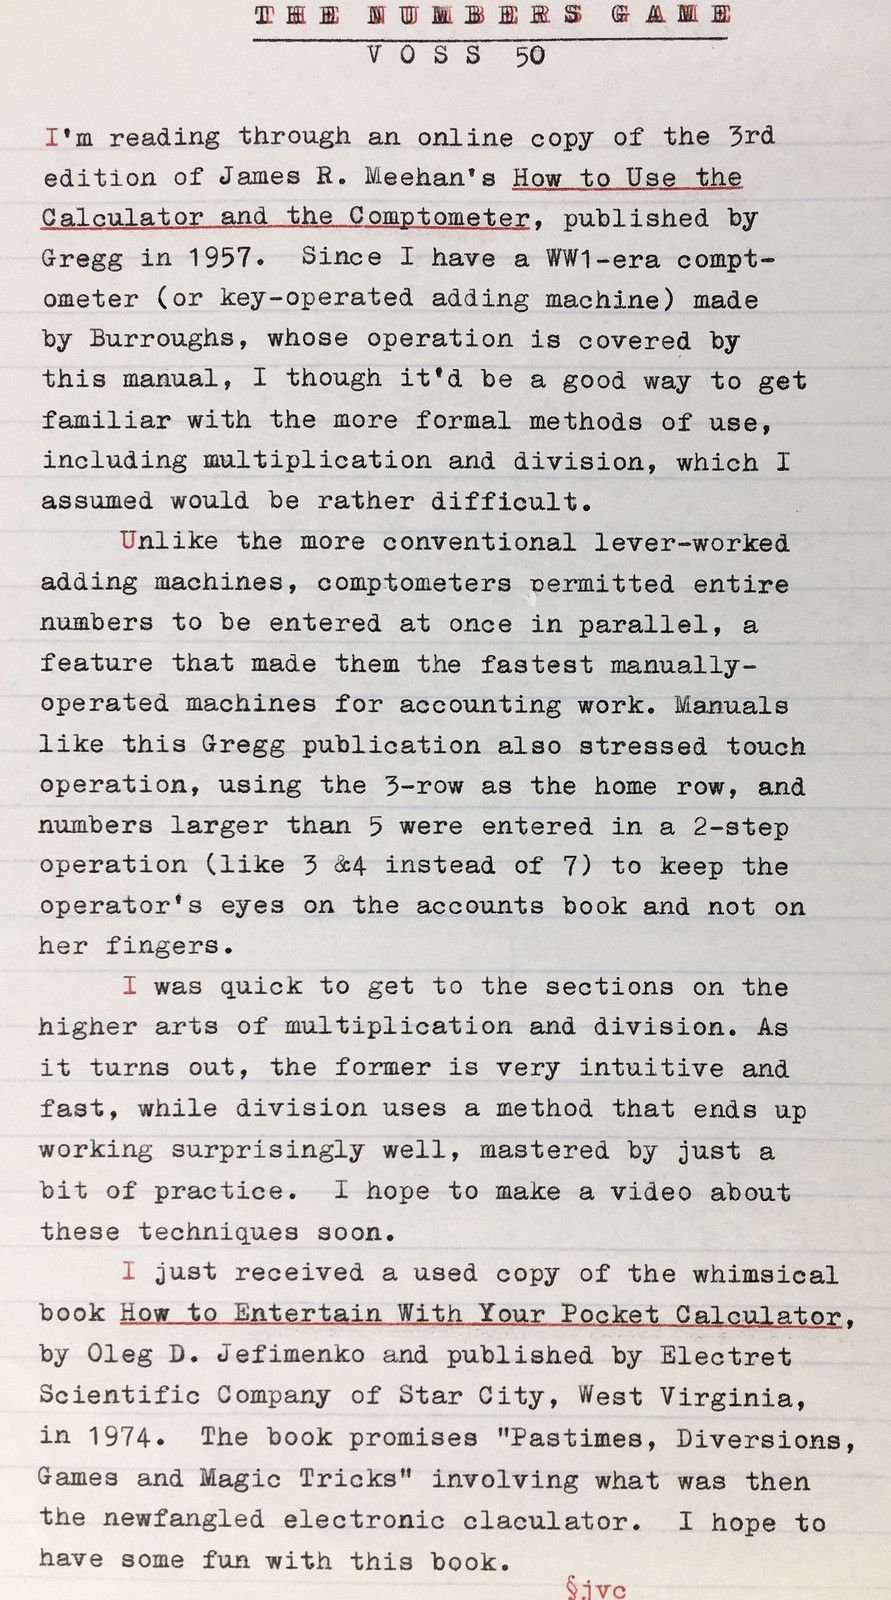
I'm really enjoying my Voss Modell 50 typewriter (used to type this piece), now that the imprint smudging and ribbon issues have been resolved. The smudging was caused by the carriage tripping right as the character was being printed, and required an adjustment to the escapement timing. These Voss typers have more adjustments than I've seen on many other machines, making it easy to resolve these kinds of problems. Also, the keyboard is a bit wider than many other medium sized portables, and there's ample clearance between the "A" key and the shift lock; touch-typing is therefore a breeze.

I was also enjoying typing on this vintage, slightly yellowed, notebook paper, which lends an immediate aged look to the piece. I need to find more of this old paper.

Stay well and do something creative!

Labels: , ,

Tuesday, June 09, 2020

Dream Machine

Groma Kolibri
Dream Machine

I worked on this machine sometime last year, when Kevin owned it, and struggled then with the skipping issues. It also was making a clanking sound, which we thought was something interfering with the bottom plate. There was also some evidence of this because of a spot on the plate with scratches. I tried padding it with foam, then tried shimming the bottom plate with washers, but it didn't really help much. Actually going without the plate ends up being quieter, but then you have the problems involved with interference with the mechanics underneath, unless it's sitting on an absolutely flat surface; forget lap-typing without the bottom cover.

There's an extension arm on the escapement rocker that's operated by the type linkages via an adjustable cam, one of the few adjustments on this machine. But gaining access is difficult, you need a special angled driver and adjustment tool. I've been tinkering with this and can get the skipping to become less frequent, but not go away entirely. Then I tried crimping a thin brass tube, a kind of shim, on the extension arm of the rocker, and that actually helped a whole lot, also making the touch a bit nicer -- but alas the brass piece slipped and I was back where I started. Finally I just put a piece of heat shrink on the arm and it seems to be working good enough for now; I only had one skip during this piece.

There's another arm of the escapement that rides on the bottom edge of the carriage as a dampener, the arm has a rubber sleeve but it's badly worn. I need to get a replacement, probably some thin Tygon tubing, about 1/8" diameter, much smaller than automotive vacuum hose.

I was also seeing some issues with the ribbon not auto-reversing, but I think it's because these new DIN-sized ribbons are shorter than a full sized spool and the sensing arms need to be reformed slightly to compensate for the smaller diameter of the ribbon pack.

That's one thing about the Kolibri, it's a beautiful machine but lacks a lot of built-in adjustments. Things have to be reformed or shimmed to compensate.

As for the clanking sound, it's dampened a bit by just typing on a thick pad, so that's the way I'll go; there's very little clearance between the mechanism underneath and the plate for any internal foam padding.

I was thinking the other day about naming this little bird. No, I don't name all my machines. Of course, there's Adobe Rose, the Royal QDL, but she's an exception. We used to have a VW Jetta turbo-diesel that we named Dieter, after the Mike Myers SNL character, but I don't see this little Kolibri as a black-clad Dieter in a German dance club. Maybe it doesn't need a name, it just needs to inspire me to write, and that's good enough for me.

Labels: , ,

Monday, June 08, 2020

Voss Modell 50

Voss Modell 50, circa 1952
Voss Modell 50

Voss Modell 50
Voss Modell 50
This machine was from John Lewis, our local typewriter shop. It was going to be used as a parts machine for repairing a newer Voss De Luxe owned by Kevin, but John managed to fix the De Luxe without robbing any parts off this older machine. John offered it to Kevin for a song, and now it's mine.

Mechanically this older Modell 50 and the newer De Luxe are very similar, they feature the same escapement mechanism for example (which, by the way, is replete with numerous adjustments), but the carriage on the De Luxe is different, especially around the paper bale. And of course the styling between the two models is different. This Modell 50 is rather masculine in appearance while the De Luxe is rounded and curvy. They also reversed the location of the back space and carriage release controls between the two models; Kevin's De Luxe was made in 1958, while my Modell 50 was made in 1952. And a sticker on the back of the De Luxe indicates it was marketed in the United States by a subsidiary of Voss, whereas on my older machine there's a paper sticker indicating Schultheis & Lenzen, Buromachinen, Koln-Aachener Str.15-17 (my apologies for not using the correct German punctuation marks.)

Aside from several cracked Bakelite panels and the hardened rubber parts, the only other issue is the springs for the paper bale are broken and missing, they are flat spring steel and only the ends remain where they were secured under mounting screws on either end of the bale. This type of spring steel can be brittle. My simple solution was to route a rubber band around from behind the right side of the carriage to the right front finger of the paper bale; it now gives plenty of pressure onto the paper.

Aside from needing more superficial polishing, I'm seriously thinking about making a ribbon cover. It won't have the same curvy shape as the original, but should be functional. It will be made from wood, and I hope to successfully seal and finish the wood into a glossy black appearance to match the rest of the machine.

There's an even earlier version of this machine, with round keys and a more conventional space bar. This is more of a hybrid machine, sporting a pre-WWII conservative appearance yet featuring modern plastic key caps.

This is one of those machines I didn't know I needed. In practical terms I don't need another typewriter; but now that it's mine, and I've put some work into it, I can say it's starting to feel like one of the family. It also has a stablemate cousin, the Triumph Norm 6 with a similar German/Hungarian keyboard. As I indicated in this piece, I have little problems typing with a QWERTZ keyboard, since I'm not a pure touch-typist on manual machines and therefore will periodically look at my fingers as I type, and make a mental note to be on the lookout for the letter "Y" so as to ensure I hit the correct key and not the "Z".

Labels: , , ,

Monday, June 01, 2020

Sunday Morning Typing

Adobe Rose
image

I spent several hours cleaning and adjusting Adobe Rose. I removed the side panels of the carriage to do some cleaning, then removed the platen and feed rollers, scrubbing them with alcohol so as to get a bit better grip on the paper. She'll be needing to get the rollers and platen covered in new rubber at some future date.

I also spent some time doing subtle adjustments to some of the type bars, to help correct some misalignment issues. It's not perfect, but better than before.

Labels: , ,